Haskell web programming
A Yesod tutorial

update: updated for Yesod 1.2
tl;dr: A simple Yesod tutorial. Yesod is a Haskell web framework. You shouldn’t need to know Haskell.
Why Haskell?
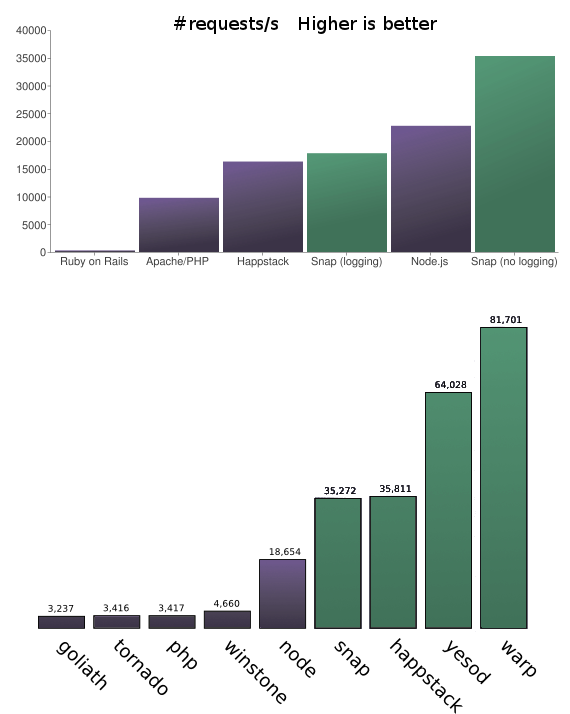
Its efficiency (see Snap Benchmark & Warp Benchmark1). Haskell is an order of magnitude faster than interpreted languages like Ruby and Python2.
Haskell is a high level language that makes it harder to shoot yourself in the foot than C, C++ or Java, for example. One of the best properties of Haskell is:
“If your program compiles it will be very close to what the programmer intended”.
Haskell web frameworks handle parallel tasks perfectly—even better than node.js3, for example.

From a purely technical point of view, Haskell seems to be the perfect web development tool. Weaknesses of Haskell certainly won’t be technical:
- Hard to grasp Haskell
- Hard to find a Haskell programmer
- The Haskell community is smaller than the community for
/.*/ There is not yet a heroku for Haskell. Even In fact, I use heroku to host my websites but this isn’t straightforward (see the how to). Update: FPComplete had filled this hole and provided cloud hosting, a complete IDE and Haskell environment. Unfortunately, FPComplete has since pivoted away from Haskell and these services no longer exist.
I won’t say these are not important drawbacks. But with Haskell your web application will be able to both absorb an impressive number of parallel requests securely and to adapt to change.
Actually there are three main Haskell web frameworks:
I don’t think there is a real winner between these three framework. The choice I made for Yesod is highly subjective. I just lurked a bit and tried some tutorials. I had the feeling Yesod did a better job at helping newcomers. Furthermore, the Yesod team seems the most active. Of course I might be wrong since this is just an impression.

Why did I write this article? The Yesod documentation and particularly the book are excellent. But I missed an intermediate tutorial. This tutorial won’t explain all details. I tried to give a step by step of how to start from a five minute tutorial to an almost production ready architecture. Furthermore explaining something to others is a great way to learn. If you are used to Haskell and Yesod, this tutorial won’t teach you much. If you are completely new to Haskell and Yesod, hopefully it will help you. Also if you find yourself too confused by the syntax, it might helps to read this article
During this tutorial you’ll install, initialize, and configure your first Yesod project. Then there is a very minimal 5 minute Yesod tutorial to get us warmed up and confirm the awesomeness of Yesod. Then we will clean up the 5 minute tutorial to use some “best practices”. Finally there will be a more standard real world example: a minimal blog system.
Before the real start
Install
The recommended way to install Haskell is to download the Haskell Platform.
If you want optimal performances I suggest you to download and compile the latest GHC Release (at least 7.8). It is generally very easy to install from source. If you go this way, you’ll need to install cabal. You should use at least cabal 1.18. Don’t forget to add cabal binaries to your PATH. Generally:
echo 'export PATH=$HOME/.cabal/bin:$PATH' >> ~/.profileAnd to be sure you have the latest cabal release:
Once done, you need to install Yesod.
Then open a terminal session and do:
There are few steps but it should take some time to finish.
Initialize
You are now ready to initialize your first Yesod project. Open a terminal and type:
Enter your name, choose yosog for the project name and enter Yosog for the name of the Foundation. Finally choose sqlite. Now, start the development cycle:
cd yosog
cabal sandbox init
cabal install --enable-tests . yesod-platform yesod-bin --max-backjumps=-1 --reorder-goals
yesod devel
This will compile the entire project. Be patient, since it will take a while the first time. Once finished a server is launched and you can visit it by clicking this link:
Congratulation! Yesod works!
Note: if something is messed up use the following command at the command line inside the project directory.
For the rest of the tutorial, use another terminal and keep this one open in a corner to see what happens.
Configure git
Of course this step is not mandatory for the tutorial but it is a good practice.
Fortunately, there is already a .gitignore file into the yosog folder. You just have to initialize your git repository:
We are almost ready to start.
A few words before we start
Up until here, we have a directory containing a bunch of files and a local web server listening the port 3000. If we modify a file inside this directory, Yesod should try to recompile as fast as possible the site. Instead of explaining the role of every file, let’s focus only on the important files/directories for this tutorial:
config/routesHandler/templates/config/models
Obviously:
config/routes
|
is where you’ll configure the map url → Code. |
Handler/
|
contains the files that will contain the code called when a url is accessed. |
templates/
|
contains html, js and css templates. |
config/models
|
is where you’ll configure the persistent objects (database tables). |
During this tutorial we’ll modify other files as well, but we won’t explore them in detail.
Also note, shell commands are executed in the root directory of your project unless specified otherwise.
We are now ready to start!
Echo
To verify the quality of the security of the Yesod framework, let’s make a minimal echo application.
Goal:
Make a server that when accessed
/echo/[some text]should return a web page containing “some text” inside anh1bloc.
~/Sites/yosog $ yesod add-handler
Name of route (without trailing R): Echo
Enter route pattern (ex: /entry/#EntryId): /echo/#String
Enter space-separated list of methods (ex: GET POST): GET
Almost all the work is done for us. The add-handler does the following:
Updates the config/route file by appending:
/echo/#String EchoR GETThis line contains three elements: the url pattern, a handler name, an http method.
- creates a
Handler/Echo.hsfile - imports
Handler.Echoin the mainApplication.hsfile - declares
Handler.Echoin the cabal file for building the application
Now try to go to localhost:3000/echo/foo. You should get a message explaining that getEchoR is not yet implemented.
So let’s take a look at Handler/Echo.hs:
module Handler.Echo where

import Import

getEchoR :: String -> Handler Html
getEchoR = error "Not yet implemented: getEchoR"
This should be straightforward. Now we can replace it with this:
module Handler.Echo where

import Import

getEchoR :: String -> Handler Html
getEchoR theText = defaultLayout [whamlet|<h1>#{theText}|]
Don’t worry if you find all of this a bit cryptic. In short it just declares a function named getEchoR with one argument (theText) of type String. When this function is called, it returns a Handler Html whatever it is. But mainly this will encapsulate our expected result inside an html text.
After saving the file, you should see Yesod recompile the application. When the compilation is finished you’ll see the message: Starting devel application.
Now you can visit: http://localhost:3000/echo/Yesod%20rocks!
TADA! It works!
Bulletproof?

Even this extremely minimal web application has some impressive properties. For example, imagine an attacker entering this url:
You can click on it to test it.
The special characters are protected for us, preventing a malicious user from hiding a bad script within the url.
This behavior is a direct consequence of type safety. The url string is put inside a url type. Then the interesting part in the url is put inside a String type. To pass from url type to String type some transformations are made. For example, all instances of “%20” are replaced by space characters. Then to show the String inside an html document, the string is put inside an html type. Some transformations occurs like replace “<” by “<”. Thanks to Yesod, this tedious job is done for us.
"http://localhost:3000/echo/some%20text%3Ca%3E" :: URL
↓
"some text<a>" :: String
↓
"some text &lt;a&gt;" :: HtmlYesod is not only fast, it helps us to remain secure. It protects us from many common errors in other paradigms. Yes, I am looking at you, PHP!
Cleaning up
Even this very minimal example should be enhanced. We will clean up many details:
- Use
Data.Textinstead ofString - Put our “views”4 inside the
templatedirectory
Data.Text
It is a good practice to use Data.Text instead of String.
To declare it, add this import directive to Foundation.hs (just after the last one):
We have to modify config/routes and our handler accordingly. Replace #String by #Text in config/routes:
/echo/#Text EchoR GET
And do the same in Handler/Echo.hs:
module Handler.Echo where

import Import

getEchoR :: Text -> Handler Html
getEchoR theText = defaultLayout [whamlet|<h1>#{theText}|]
Use templates
Some html (more precisely hamlet) is written directly inside our handler. We should put this part inside another file. Create the new file templates/echo.hamlet containing:
and modify the handler Handler/Echo.hs:
module Handler.Echo where

import Import

getEchoR :: Text -> Handler Html
getEchoR theText = defaultLayout $(widgetFile "echo")
At this point, our web application is nicely structured. We use Data.Text and our views are in templates. It is the time to make a slightly more complex example.
Mirror

Let’s make another minimal application. You should see a form containing a text field and a validation button. When you enter some text (for example “Jormungad”) and validate it, the next page presents the content to you with its reverse appended to it. In our example, it should return “JormungaddagnumroJ”.
First, add a new handler:
 ~/Sites/yosog (master) $ yesod add-handler
Name of route (without trailing R): Mirror
Enter route pattern (ex: /entry/#EntryId): /mirror
Enter space-separated list of methods (ex: GET POST): GET POST
This time the path /mirror will accept GET and POST requests. Update the corresponding new Handler file (Handler/Mirror.hs):
module Handler.Mirror where

import Import
import qualified Data.Text as T

getMirrorR :: Handler Html
getMirrorR = defaultLayout $(widgetFile "mirror")

postMirrorR :: Handler Html
postMirrorR =  do
        postedText <- runInputPost $ ireq textField "content"
        defaultLayout $(widgetFile "posted")
We will need to use the reverse function provided by Data.Text which explains the additional import.
The only new thing here is the line that gets the POST parameter named “content”. If you want to know more detail about it and forms in general you can take a look at the Yesod book.
Create the two corresponding templates (templates/mirror.hamlet and templates/posted.hamlet):
<h1> Enter your text
<form method=post action=@{MirrorR}>
    <input type=text name=content>
<input type=submit>And that is all. This time, we won’t need to clean up. We might have generated the form a different way, but we’ll see how to do this in the next section.
Just try it by clicking here.
Also you can try to enter strange values (like <script>alert('Bad');</script>). As before, your application is quite secure.
A Blog
We saw how to retrieve http parameters. It is the time to save things into a database.
This example will be very minimal:
GETon/blogshould display the list of articles,POSTon/blogshould create a new article,GETon/blog/<article id>should display the content of the article.
As before, we’ll start by adding some handlers:
~/Sites/yosog (master) $ yesod add-handler
Name of route (without trailing R): Blog
Enter route pattern (ex: /entry/#EntryId): /blog
Enter space-separated list of methods (ex: GET POST): GET POST

~/Sites/yosog (master) $ yesod add-handler
Name of route (without trailing R): Article
Enter route pattern (ex: /entry/#EntryId): /blog/#ArticleId
Enter space-separated list of methods (ex: GET POST): GET
Then we declare another model object. Append the following content to config/models:
Article
    title   Text
    content Html
    deriving
As Html is not an instance of Read, Show and Eq, we had to add the deriving line. If you forget it, there will be an error.
After the route and the model, we write the handler. Let’s write the content of Handler/Blog.hs. We start by declaring the module and by importing some block necessary to handle Html in forms.
module Handler.Blog
    ( getBlogR
    , postBlogR
    )
where

import Import

-- to use Html into forms
import Yesod.Form.Nic (YesodNic, nicHtmlField)
instance YesodNic AppRemark: it is a best practice to add the YesodNic instance inside Foundation.hs. I put this definition here to make things easier but you should see a warning about this orphan instance. To put the include inside Foundation.hs is left as an exercice to the reader.
Hint: Do not forget to put YesodNic and nicHtmlField inside the exported objects of the module.
entryForm :: Form Article
entryForm = renderDivs $ Article
    <$> areq   textField "Title" Nothing
    <*> areq   nicHtmlField "Content" Nothing
This function defines a form for adding a new article. Don’t pay attention to all the syntax. If you are curious you can take a look at Applicative Functor. You just have to remember areq is for required form input. Its arguments being: areq type label default_value.
-- The view showing the list of articles
getBlogR :: Handler Html
getBlogR = do
    -- Get the list of articles inside the database.
    articles <- runDB $ selectList [] [Desc ArticleTitle]
    -- We'll need the two "objects": articleWidget and enctype
    -- to construct the form (see templates/articles.hamlet).
    (articleWidget, enctype) <- generateFormPost entryForm
    defaultLayout $ do
        $(widgetFile "articles")
This handler should display a list of articles. We get the list from the DB and we construct the form. Just take a look at the corresponding template:
<h1> Articles
$if null articles
    <p> There are no articles in the blog
$else
    <ul>
        $forall Entity articleId article <- articles
            <li>
                <a href=@{ArticleR articleId} > #{articleTitle article}
<hr>
  <form method=post enctype=#{enctype}>
    ^{articleWidget}
    <div>
        <input type=submit value="Post New Article">
Notice we added some logic inside the template. There is a test and a “loop”.
Another very interesting part is the creation of the form. The articleWidget was created by Yesod. We have given it the right parameters (input required or optional, labels, default values), and now we have a protected form made for us. But now we have to create the submit button.
You can take a first look by clicking here. Of course, you can’t post something yet.
Get back to Handler/Blog.hs.
postBlogR :: Handler Html
postBlogR = do
    ((res,articleWidget),enctype) <- runFormPost entryForm
    case res of
         FormSuccess article -> do
            articleId <- runDB $ insert article
            setMessage $ toHtml $ (articleTitle article) <> " created"
            redirect $ ArticleR articleId
         _ -> defaultLayout $ do
                setTitle "Please correct your entry form"
                $(widgetFile "articleAddError")
This function should be used to create a new article. We handle the form response. If there is an error we display an error page, for example if we left some required value blank. If things go well:
- we add the new article inside the DB (
runDB $ insert article) - we add a message to be displayed (
setMessage $ ...) - we are redirected to the article web page.
Here is the content of the error Page:
<form method=post enctype=#{enctype}>
    ^{articleWidget}
    <div>
        <input type=submit value="Post New Article">
Finally we need to display an article. For this we will modify Handler/Article.hs
getArticleR :: ArticleId -> Handler Html
getArticleR articleId = do
    article <- runDB $ get404 articleId
    defaultLayout $ do
        setTitle $ toHtml $ articleTitle article
        $(widgetFile "article")
The get404 function tries to do a get on the DB. If it fails, it returns a 404 page. The rest should be clear. Here is the content of templates/article.hamlet:
<h1> #{articleTitle article}
<article> #{articleContent article}
<hr>
<a href=@{BlogR}>
    Go to article list.
The blog system is finished. You can jump to it by clicking here.
Just for fun, you can try to create an article with the following content:
Conclusion
This is the end of this tutorial. I made it very minimal.
If you already know Haskell and you want to go further, you should take a look at the recent i18n blog tutorial. It will be obvious I based my own tutorial on it. You’ll learn in a very straightforward way how easy it is to use authorization, Time and internationalization.
If, on the other hand, you don’t know Haskell, then you shouldn’t jump directly to web programming with it. Haskell is a very complex and unusual language. My advice to go as fast as possible in using Haskell for web programming is:
- Start by trying Haskell in your browser
- Read my tutorial Learn Haskell Fast and Hard on School of Haskell
- Then read the excellent Learn you a Haskell for Great Good
- If you have difficulty understanding concepts like monads, you should really read these articles. For me they were enlightening.
- If you feel confident, you should be able to follow the Yesod book but if you find it difficult to follow the Yesod book, you should read real world Haskell first.
Also, note that:
- haskell.org is full of excellent resources.
- hoogle will be very useful
- Use hlint as soon as possible to get good habits.
As you should see, if you don’t already know Haskell, the path is long but I guarantee you it will be very rewarding!
ps: You can download the source of this Yesod blog tutorial at github.com/yogsototh/yosog.
One can argue these benchmark contains many problems. But the benchmarks are just here to give the basic idea, namely that Haskell is very fast.↩
Generally high level Haskell is slower than C, but low level Haskell is equivalent to C speed. It means that even if you can easily link C code with Haskell, this is not needed to reach the same speed. Furthermore writing a web service in C/C++ seems to be a very bad idea. You can take a look at a discussion on HN about this.↩
If you are curious, you can search about the Fibonacci node.js troll. Without any tweaking, Haskell handled this problem perfectly. I tested it myself using Yesod instead of Snap.↩
By view I mean yesod widget’s hamlet, lucius and julius files.↩